Monday 2 December 2013

Revisiting some old school keyboards.

Most people tend to love hoarding things, especially males. In my case the case is not so much different as I collect things of interest. 

My interest with old school keyboards have begun when I was a kid. Although I missed my chances to collect the very first keyboard that I touched or so. I managed to get a hold of one quite old keyboard. 

When I started living in shared accomodation I managed to "snatch" another old keyboard. Though I was not always just simply collecting old keyboards mind you I was collecting things of interest. I also have other normal keyboards as well however as of late my interest has now been looking at mechanical keyboards.

Aside from my HHKB purchase, the two other keyboards that I have had issues of either one sort or another. The two keyboards in question are: Northgate Omnikey 101 and APC/Clicker F-21 respectively.

Previously having briefly discussed about mechanical keyboards I am not going to go through the same discussion here. These two keyboards are Alps based switches. Northgate Omnikey 101 using a true Alps branded switch whilst the APC Clicker F-21 using a cloned variant and they don't exactly label it as Alps but APC membrane switch with the slider that looks like it was based off Alps.

There are already some information floating on the web for the Northgate Omnikey 101 so I also rehash on such information. However APC Clicker 101 is quite an interesting story. 

APC/Clicker brand is a Taiwanese brand and the actual name of the manufacturer is Tai Hao. What makes it interesting is that on the front of the keyboard shows the brand name/logo as Clicker. On the reverse side of the keyboard tells one that it is APC brand. Why would a keyboard feature two different brand names? The real answer is a bit of a mystery.

From my understanding, APC brand name is most likely a registered/trademark for the US company that deals with UPS (Uninterrrupted Power Supply). Most likely the APC brand in US for instance has been around longer than Tai Hao or APC. So in a bid to prevent confusion and/or any legal preceedings (if any) over the use of the said brand name APC may have traded their name as Clicker. However the Clicker name is only what it is bearing at the front of the keyboard but not on the back of it. It could also have been that the Clicker name is just a model name. If you look at Northgate Omnikey 101 for instance, you have the brand name, the model name and the model number for instance. So another possible explanation is that the full name of the said keyboard for APC/Clicker F-21 would most likely be APC Clicker F-21 respectively.

Adding more twist to the story is that the said same keyboard (Clicker, that is what I will refer to from now on) does not print any model numbers on the back of the keyboard. The question then leads onto how does one find out which model of APC Clicker do they have if it is not labelled on the back of the keyboard or the front? The answer lies on the controller board within the keyboard. At least this is true in my case. There was simply no other ways to tell the APC Clicker boards apart from just staring at the keyboard without taking it apart.

These clicker boards so far I have noticed (one from an online forum/wiki deskthority) and the other being the keyboard that I own is completely different case and logo design.

They also say that you can never be able to judge a book by simply looking at the front cover. The same said case is quite true for the clicker that I own. When I decided to pull mine apart and to see what sort of switches, etc did it have. I noticed something particularly odd apart from being an Alps sort of clone. The only "hard" PCB component was the controller whilst the rest of the board are all sitting on membrane sort of structure (which is both light and flexible). This would now make the Clicker in question a more of a hybrid rather than a true mechanical considering that it has a spring underneath each spring but the board that would then pick up the signals from the key presses are just a mere membrane base (apart from the controller PCB of course).

One particular thing I have noticed when taking my Clicker board apart was that the little metal plates comes (from each key) out with little to no effort. If one was not cautious in taking their Clicker or Clicker like boards apart they would notice those little plates would either fly out or gets misplaced. If the key caps were removed before the back of the keyboard case was opened and again if not cautious as well, both the springs as well as the slider would also come out fairly easily. You could say when dealing with hybrid keyboards like this one needs to exercise appropriate caution rather than being brash when the keyboard case does not easily budge (when opening for instance). 

As with most of my other blog entries with including links as well as photos I will do so here. However my photos will not only cover my Clicker keyboard alone, it will cover photos of my Northgate Omnikey 101 where I will.. *ahem* proudly show off my poor attempts at trying to pull the key caps off my Northgate Omnikey 101 with my bare hands as well as minimal experience.

Some interesting information for those interested about Northgate Omnikey 101 or Northgate keyboards:
Here are some interesting information for those interested about APC Clicker F-21:

Undoubtably there are a few people that I want to give thanks to for giving me information on this particular case.
  • Daniel Beardsmore (of both Deskthority and Geekhack) - For constant information on Alps switches as well as potentially posting information on Deskthority wiki about the Alps switches, keyboards, etc.
  • "mbodrov" of Deskthority - For post on the Clicker keyboard that he/she has. 
  • A few other sites that I have posted links to, thanks for hosting these!
  • "laffindude" via Geekhack IRC for telling me that the "Enter" key found on the Clicker boards are not ISO "Enter" key but just a big "Enter" key which was made at one stage but was discontinued.
  • daemonraccoon for pointing out certain deprecated terms along with redundant use of incorrect labelling for a specific type of switch technology. 
  • ZeDestructor via Reddit Mechboard IRC for betting that my Clicker board was not suffering from "yellowing" but it is just dirty/stained. He was pretty right on the money there.
Now... time for photos!
NOKIA|N900|Not defined|1/30sec|F2.8|5.2mm|ISO-200|No flash|2013:12:02 07:35:28
Here is the Northgate Omnikey 101. Apart from two accidentally broke key cap stems the keyboard looks fine otherwise. Though the switch for button "B" I believe is broken. In other case it will probably need to be sent off for repairs.
NOKIA|N900|Not defined|1/20sec|F2.8|5.2mm|ISO-264|No flash|2013:12:02 07:36:08
A close up of the underneath for one of the keys with the broken stem. YOu can see the rectangular mark in the (sort of) middle seems to be very short in fact it has been trimmed.
NOKIA|N900|Not defined|1/30sec|F2.8|5.2mm|ISO-200|No flash|2013:12:02 07:39:28
The reverse side of the Northgate Omnikey 101. Nothing really fancy here apart from few wear and tear marks for the keyboard of its age.
NOKIA|N900|Not defined|1/33sec|F2.8|5.2mm|ISO-123|No flash|2013:12:02 07:39:58
I believe this might be a regular PS/2 lookalike socket. Though the actual cable tells a different story. On one end the cable has a 270 degree bend on one end which plugs into the keyboard whilst the other side shows a 5 pin DIN connector. Fortunately the keyboard does not need any firmware programming for it to work with modern computers.
NOKIA|N900|Not defined|1/33sec|F2.8|5.2mm|ISO-114|No flash|2013:12:02 07:40:18
An overview of the rear side of the Northgate Omnikey 101. There is only one socket as it is clearly evident. There are some versions of the Northgate Omnikey series that has more than one of those sockets on the back.
NOKIA|N900|Not defined|1/22sec|F2.8|5.2mm|ISO-200|No flash|2013:12:02 07:41:02
Underneath the logo on the front of the keyboard is actually a small door allowing one to adjust various settings for the keyboard functionality.
NOKIA|N900|Not defined|1/24sec|F2.8|5.2mm|ISO-200|No flash|2013:12:02 07:46:16
The outer case being taken off reveals nothing all that fancy. The only class it has is that the switches seems stay on the metal plate. Modern keyboards forgos such metal plates probably because of the weight and expense.
NOKIA|N900|Not defined|1/26sec|F2.8|5.2mm|ISO-200|No flash|2013:12:02 07:46:48
Close up photo of what I believe is the actual controller for the keyboard. There is at least one chip on the PCB within virtually every normal keyboard which basically interfaces between the computer as well as the user whom is pressing all the keys.
NOKIA|N900|Not defined|1/20sec|F2.8|5.2mm|ISO-325|No flash|2013:12:02 07:52:26
Clearly a nice way to see broken keycap stem sitting intact with the Alps switch. Unfortunately it is not easy to see the markings of the switch housing due to the various lighting and camera angle settings needed. Though a more clearer one is shown later on.
NOKIA|N900|Not defined|1/20sec|F2.8|5.2mm|ISO-303|No flash|2013:12:02 07:54:05
A close up of the Alps complicated switch. Clearly it is attached to the metal plate/cover. Also it seems to be housed in a much different way than Clicker board. Cherry MX boards are somewhat similar to the setup shown here. This photo is actually off the right Alt key which was pulled off "cleanly" unlike the shots shown above.
NOKIA|N900|Not defined|1/250sec|F2.8|5.2mm|ISO-100|Fired|2013:12:02 07:54:34
With this one can see some of the inscriptions on the Alsp switch housing. Not all of them again due to the lighting angles as well as camera settings needs to be well defined.
NOKIA|N900|Not defined|1/27sec|F2.8|5.2mm|ISO-200|No flash|2013:12:02 08:03:24
APC Clicker F-21 keyboard. This photo shows how dirty the keyboard has become in around a decade or two worth of usage. The "Enter" key is not ISO Enter key, the red characters on the most of the key legends are Chinese bopomofo whilst the blue characters are actual Chinese words (Changjie). This basically signifies that the main purpose of this keyboard was to allow input of Chinese characters. Obviously.
NOKIA|N900|Not defined|1/250sec|F2.8|5.2mm|ISO-100|Fired|2013:12:02 08:03:44
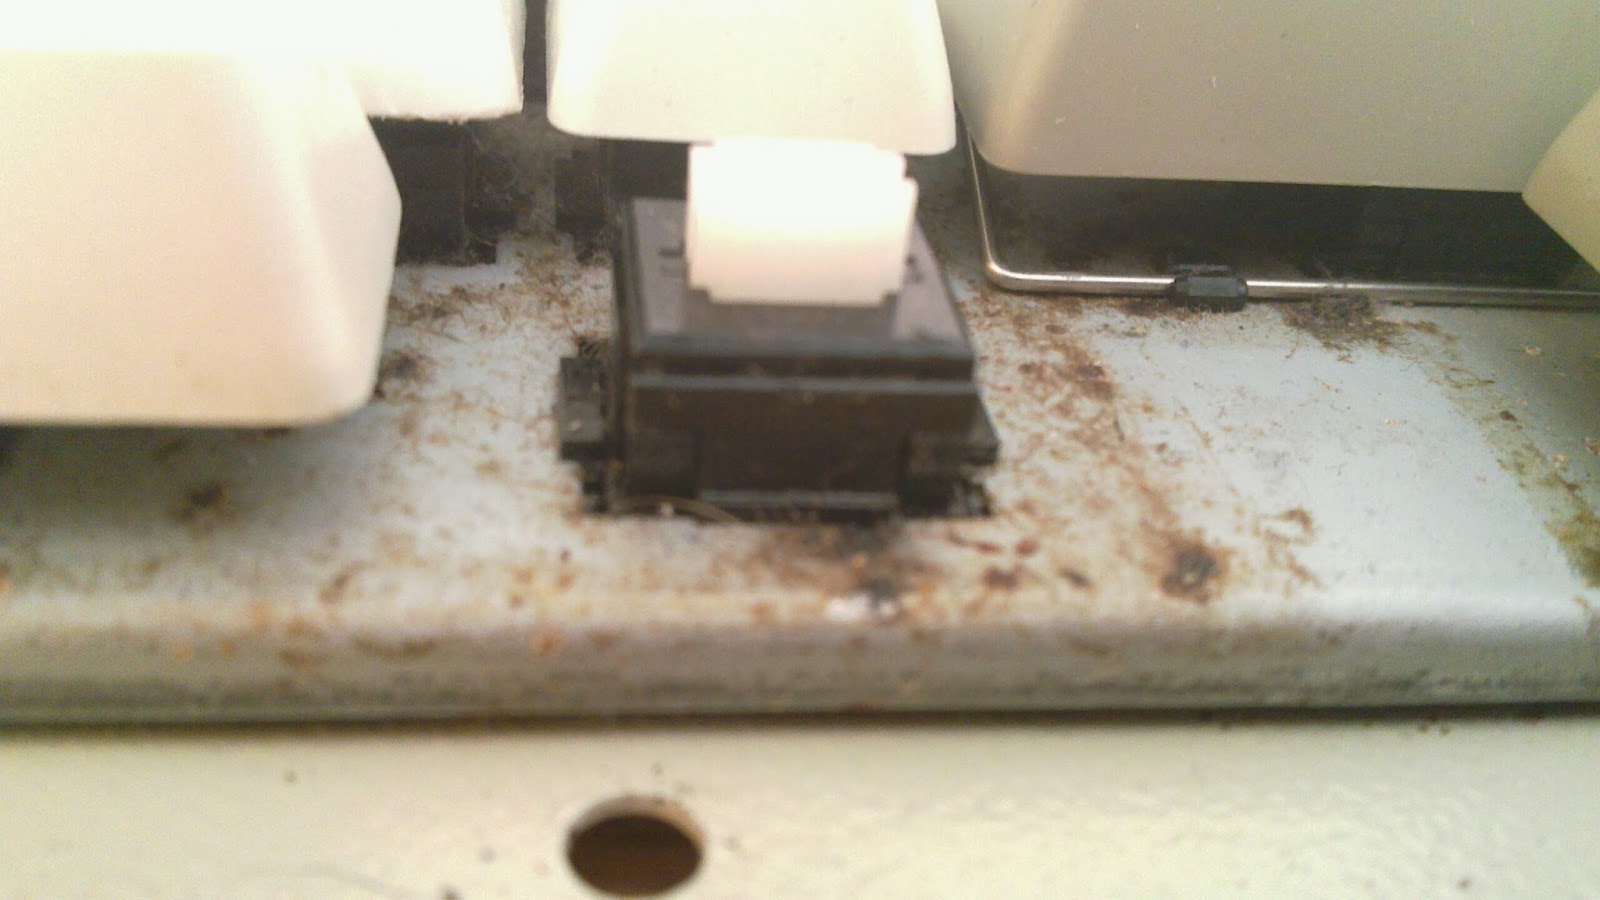
Previous photo showed a missing key cap but that was intentional. Here you can see the undersides of one sample key cap being pulled off and placed in between the keys of "Esc" and "F1" respectively. Notice how the switch housing is white and it appears to not have any inscriptions on it. Even at that the "socket"/slider still closely resembles to that of the Alps switch.
NOKIA|N900|Not defined|1/33sec|F2.8|5.2mm|ISO-200|No flash|2013:12:02 08:04:11
The reverse sides of the keyboard. Again, you can see how on the obverse side the logo printed on the top left hand side of the keyboard is named as "Clicker" whereas the reverse side bears the label "APC". Even worse, there are no model numbers making it hard to identify which exact model this is.
NOKIA|N900|Not defined|1/24sec|F2.8|5.2mm|ISO-200|No flash|2013:12:02 08:07:23
The back of the Clicker keyboard taken off, here it bears the membrane lookalike board for the keys yet the controller board is actually a proper PCB.
NOKIA|N900|Not defined|1/24sec|F2.8|5.2mm|ISO-200|No flash|2013:12:02 08:09:21
Taken off two screws that held the keyboard controller along with the membrane base in place. Here one can see all the various diodes, chip, LED, etc.
NOKIA|N900|Not defined|1/20sec|F2.8|5.2mm|ISO-229|No flash|2013:12:02 08:09:42
A close up photo of the actual controller chip itself. Notice how the membrane board connects with a proper PCB. It looks similar to how smartphones at one stage used for instance to connect a "soft" board with a "hard" board.
NOKIA|N900|Not defined|1/29sec|F2.8|5.2mm|ISO-200|No flash|2013:12:02 08:16:52
Photo of the APC membrane switch. I had to reposition a few metal plates as they were misplaced. It does not take all that much effort to really misplace the metal plates.
NOKIA|N900|Not defined|1/20sec|F2.8|5.2mm|ISO-200|No flash|2013:12:02 08:20:04
Again just a closer photo of the APC membrane switch. Notice the "hole" in where it was supposed to lie for the !/1 key.
NOKIA|N900|Not defined|1/29sec|F2.8|5.2mm|ISO-200|No flash|2013:12:02 08:19:06
The main elements of what a APC membrane switch, notice that there is no housing, the switch housing is part of the kebyoard case much like how PFU HHKB Pro's design with Topre's housing as part of the case. Here the photo just shows the slider, the spring as well as the metal plate. Only one metal plate per key.
NOKIA|N900|Not defined|1/24sec|F2.8|5.2mm|ISO-200|No flash|2013:12:02 08:22:03
This is roughly what it would look like if it were sitting inside the keyboard. The metal plate might be a bit too far behind but meh. 
NOKIA|N900|Not defined|1/33sec|F2.8|5.2mm|ISO-200|No flash|2013:12:02 08:23:24


Membrane photo shots, nothing all that much interesting to see here as it is usually multi layered.
NOKIA|N900|Not defined|1/33sec|F2.8|5.2mm|ISO-200|No flash|2013:12:02 08:23:56
Apparently this makes the membrane layer to be three instead of two. You can see the previous photo how the last layer is more blue than the photo shown here.
NOKIA|N900|Not defined|1/20sec|F2.8|5.2mm|ISO-214|Fired|2013:12:02 15:14:11
After taking all the photos I got sick of how unkempt the keyboard looked so I decided to give it a good clean with metholated spirits, cloth, worn toothbrush along with the tools needed to take the keyboard apart. It was a very long process to clean it considering how each of the switches needs to be taken out of their housings, placed accordingly, the stabilisers under some long keys such as as Ctrl, Alt, Numpad enter, Spacebar as well as the big Enter key. The enter key was a real pain, two stabilisers instead of one.
NOKIA|N900|Not defined|1/20sec|F2.8|5.2mm|ISO-200|Fired|2013:12:02 15:14:27
The finished refurbishment of the undersides for the Clicker keyboard.

Inevitably the Clicker keyboard still had issues with the big Enter key for instance still sticking down for some weird reason. I have tried swapping the metal plate from the Enter key to one of the lesser used keys such as right Ctrl and Alt. I have already swapped the metal plate for the spacebar which seems to work so far without much of a hitch but at times the Enter key can still stick. 

**update** Since then, I bought a can of lube (WD-40 3-in-1 professional Dry lube with PTFE). There weren't much documentation on how to best lube these APC Clicker keyboards so I decided to lube the sides where the leaf springs sit. This meant that I need to open the keyboard up, take the leaf springs out and spray the lube before placing the leaf springs and all back in.

Initially I though I killed the keyboard when I plugged the keyboard back in I saw the LED lights were either flickering on all three Lock LED or showing Caps and Scroll Lock LED on. The keyboard seems to have a key or two stuck down even though physically they are not. That was then I thought the keyboard was really dead.

I unplugged the keyboard and decided to sort of momentarily drop my interest on preserving this old school part mechanical keyboard. It wasn't until when I was talking about the same keyboard that one day I decided to try and plug the keyboard back in to see if there are any signs of life.

The keyboard seems to slowly start showing signs of life. Some of the Lock keys seem to function but intermittently. I decided to try and see if there is anything I can do to make the keyboard work again. It turns out that the membrane board was somewhat partly covered in excess lube that I did last time round. With each succession (of testing) I decided to wipe off excess lube and see if the keyboard can be brought back to life. Ultimately after all these rinse-and-repeat process the keyboard is back alive again! I was really happy that it seems like all my efforts has not really gone to waste and that the keyboard was not about to give up on itself yet.

Despite all the efforts in refurbishing and lubing again on the switches, very little has improved on the feel of the keyboard. Some of the keys that seemed to be stuck I found out later on was mainly due to the fact that the leaf springs were bent. It was not easy to fix them and I decided to swap those faulty leaf springs with the leaf springs from other keys that I hardly use. The end result was only marginally better. The feel of typing away on the keyboard feels inconsistent. Some of the keys required more actuation (pressing hard to input a signal to the computer) whilst others required little effort for the same desired effect. I guess despite all this, I would agree with some of the people from deskthority have mentioned. The feel of these APC membrane keys are really not all that great. Sure it is clicky (on some parts) but the feel is really not all that great and because it is inconsistent it is hard to type properly on the keyboard itself.

What can be said ultimately about these APC keyboards? they are somewhat an interesting keyboard in it's own right however they aren't really worth all that effort to be restored to it's former glory. For a partly mechanical keyboard it did seem to achieve one goal which was to make the feel almost like as if one is on a mechanical keyboard (with that spring and all noise) however on another front the feel is totally inconsistent. There are some keyboard aficionado whom would love to type faster without "bottoming out" when typing (as bottoming out may make loud noise on mechanical keyboards and thus besides maybe spent more time overall on making sure the keys are properly actuated) would find APC Clicker keyboards uninteresting. Certainly it would make the typing experience very hard to master on a keyboard with certain keys that requires less force than others and that they were not arranged in some formation that makes the feel more even across all the fingers (like what Realforce for instance did with variable weights on groups of keys).

Monday 11 November 2013

Topre Japanese replacement key caps for Realforce 108KT1 white SA0100-KT1 arrives!

So just today I got the Realforce replacement key caps for my HHKB Pro JP Type-S.

For those that didn't know Realforce is the main company behind Topre key switch and PFU's (which makes HHKB keyboards along with various other things) HHKB Pro (not the Lite2 or other earlier designs) share the same Topre switch. Of course HHKB Pro does not entirely share the same key caps as Realforce keyboards, notably the modifiers such as Tab, Control, Shift, Alt, etc. Though with the rest of the other keys both Realforce and HHKB are alike.

Some background info, I got my HHKB Pro JP Type-S and it seems to me the only variant available for the white version are the printed key legends. There are no white version without the printed key legends for the JIS layout unfortunately. So I thought to myself if they have the spare key caps available for HHKB Pro JP and if they were all printed key legends. Why won't they offer them with proper Japanese characters on the same set of the key caps? Something does seem to be amiss here.

Of course I must once again thank two people in particular for helping me out. Namely jdcarpe for showing that one can Realforce SA0100 key caps on HHKB (although the thread in which he posted was a for sale thread and not actually the discussion of such possibility). His original thread can be found here: http://geekhack.org/index.php?topic=37487.msg715325#msg715325 (have a look at the second photo which clearly indicates the possibility.). Also to OO2 for extra confirmations (I am a real skeptic.. honestly. I also thought if there was a possibility to replace some more key modifiers whilst at it but unfortunately there are only very little one can actually swap between Realforce and HHKB).

I sourced my spare Japanese key caps from Amazon with the seller: cocorico38. To be frank it was my first time buying something from amazon. I am much more formidable when navigating around ebay but not amazon. Spare Realforce key caps aren't cheap but I guess one pays for the materials they used for plastic (PBT) and the printing method of key legends (sublimated). The same that is found on HHKB Pro series, so I can be certain that if I were to buy these spare Realforce key caps I can be certain that the same materials and all are used without having to worry further down the track.

After a few days of wait I got my replacement key caps and as usual I took many photos of it:
NOKIA|N900|Not defined|1/53sec|F2.8|5.2mm|ISO-100|No flash|2013:11:12 10:26:44
Alright! here is the package. As usual Realforce is a Japanese brand so it wouldn't be a surprise that it came from Japan.
NOKIA|N900|Not defined|1/59sec|F2.8|5.2mm|ISO-100|No flash|2013:11:12 10:27:10
The obverse side of the package. Interesting, this time FedEx is the carrier.
NOKIA|N900|Not defined|1/34sec|F2.8|5.2mm|ISO-200|No flash|2013:11:12 10:27:31
The contents of the bag, a nicely bubble wrapped item. Note that both ends were originally sticky taped. I was a little too eager as I decided to cut through both the outer (FedEx) bag as well as one side of the bubble wrap packaging before I decided that I really needed to take photos first. Oh well.
NOKIA|N900|Not defined|1/33sec|F2.8|5.2mm|ISO-123|No flash|2013:11:12 10:28:31
Here is basically the star of the said item.
NOKIA|N900|Not defined|1/26sec|F2.8|5.2mm|ISO-200|No flash|2013:11:12 10:29:11
Opening the box reveals a cardboard that I guess gives even more protection to the key caps.
NOKIA|N900|Not defined|1/33sec|F2.8|5.2mm|ISO-174|No flash|2013:11:13 10:29:32
Taking that first layer of cardboard off (which was thin, just like HHKB Pro JP's set of spare key caps). Key caps emerge with the exact legends that I wanted.
NOKIA|N900|Not defined|1/33sec|F2.8|5.2mm|ISO-162|No flash|2013:11:12 10:29:48
Taking the first layer of cardboard off seems to allow one to get closer to the actual keys. Though something is a bit of amiss. It seems like there is yet another layer of cardboard.
NOKIA|N900|Not defined|1/33sec|F2.8|5.2mm|ISO-151|No flash|2013:11:12 10:20:01
Looks like I wasn't wrong about that, very unusual. I don't think the spare set of key caps for my HHKB Pro JP had two layers of cardboard before one reaches to the bottom layer.
NOKIA|N900|Not defined|1/33sec|F2.8|5.2mm|ISO-200|No flash|2013:11:12 10:30:33
So after taking that first layer of cardboard with all the keys out reveals the other set. Unfortunately there isn't much other key caps that I want to use from this layer as they are mostly incompatible with my HHKB Pro JP...
NOKIA|N900|Not defined|1/33sec|F2.8|5.2mm|ISO-107|No flash|2013:11:12 10:34:11
So.. I have prepared my HHKB Pro JP Type-S along with the key cap puller that I got with my spare set of key caps for my HHKB. As you can see the key cap puller tool was never used since I bought it until today! (that is of course).
NOKIA|N900|Not defined|1/33sec|F2.8|5.2mm|ISO-123|No flash|2013:11:12 10:35:09
Another photo but this time the key cap puller tool is out of its plastic wrapping.The sticky tape was so old on the plastic wrapper for the key cap puller tool that I could easily rip the wrap apart. =_=;
NOKIA|N900|Not defined|1/33sec|F2.8|5.2mm|ISO-132|No flash|2013:11:12 10:51:31
I decided to start pulling the keys off, starting with the top row. It was not so easy with the top row compared to the rest considering how close the key cap sat compared to the edge of the HHKB. Undeniably after a few weeks of HHKB usage my HHKB showed that it trapped hairs amongs many other particles. It was not as easy as I thought that I could wipe it clean but I gave it a quick run down. Note to self: keyboard is probably due for proper cleaning soonish.

I have also decided that whenever I pull the key caps off I would make sure that I place them relative to where they were on the keyboard as it is on the desk. This is so that I won't get confused in any shape or form down the track. Yes I could have also just opened my other set of spare keys which were meant to be for the HHKB JP so then I can reference it but I decided this idea was much better.
NOKIA|N900|Not defined|1/24sec|F2.8|5.2mm|ISO-200|No flash|2013:11:12 11:07:50
As I began taking one key cap out of the Realforce set and placed them onto my HHKB JP (I had to push a few keys down a couple of times because when they were placed on the slider they seem to be going off on an angle. I also noticed that some of the keys as I began to test them, they decided to fall out of their places, etc). I also decided to put the original HHKB JP key caps into the Realforce box as that would seem to be the only logical option. (^ρ^)
NOKIA|N900|Not defined|1/34sec|F2.8|5.2mm|ISO-100|No flash|2013:11:12 11:13:13
After finally done the key cap replacements I recalled that the design of the box between the Realforce and HHKB were remarkably similar. Could it be that both of these boxes are actually of the same size? So I took the photos. It appears they are completely of different size but of course bared the same sort of design. Evidently the box label locations are different on both.
NOKIA|N900|Not defined|1/33sec|F2.8|5.2mm|ISO-107|No flash|2013:11:12 11:13:29
Here is a photo of both boxes, the one on the bottom is no surprise, HHKB JP. You can see that it is clearly longer compared to the Realforce box.
NOKIA|N900|Not defined|1/33sec|F2.8|5.2mm|ISO-200|No flash|2013:11:12 11:13:52
Here is a photo to show how much it would roughly overhang for the HHKB JP.
NOKIA|N900|Not defined|1/33sec|F2.8|5.2mm|ISO-141|No flash|2013:11:12 11:14:07
Another photo of it on the side. You can clearly see the designs of both of these boxes are identical yet the HHKB JP is taller and longer than the Realforce. The contents in both boxes are quite different apart from the obvious fact that both have are made for different set of keyboards in mind. The clues I will leave that for the readers to figure out...

After thoughts: It really is quite bizarre how with HHKB JP white bearing key legends as well as the usual JIS sort of layout but no Japanese key legends printed on the keys. Whilst on the other hand Realforce has these key legends printed on their keyboards but of course are only suited to Realforce keyboards. HHKB Pro makes use of Fn keys and the alternative functions of a fair few of those keys are labelled on the front (not the top) of the key caps. Swapping HHKB key caps with Realforce replacement Japanese key caps for instance forgoes all that. It basically comes as a sacrifice one has to make.

On the other hand, whilst PFU likes to restrict the customisations one can do to their HHKB in terms of key legends and key cap colours. It seems as though for the modifiers with it being offered (although rare and in limited production forms) for blue Esc key as well as red Control key. Again something really is amiss. If PFU likes to hold rights for the dimensions of the key dimensions and all couldn't have they also release HHKB JP with proper Japanese key legends alongside the usual QWERTY keys? I seriously do not consider this as some sort of insanely hard option to implement. uTron has Japanese key legends alongside Realforce for JIS keyboards yet PFU has none when it comes to HHKB (especially Pro). 

If PFU are omitting this by design, it is seriously bad to see how one needs to go into extra lengths when they could have offered it as an option. As a result the extra key cap profit in this case would go into Realforce's pockets and not to PFU because of their choice in not offering such flexibilities _especially_ when one has HHKB Pro JP _and_ because the white JP layout does not come with blanks but with printed key legends they are _only_ offered without Japanese key legends which is quite amiss.

Bonus reading: There are a few extra key caps one can replace from Realforce to HHKB Pro JP apart from alphanumeric keys. jdcarpe has noted that with a replaced space bar. The Enter and backspace keys can be replaced. Arrow keys can be replaced as well (by why would want to? (・_・;)), so can one replace Esc and potentially the Tab key. I placed the Realforce's Tab key over my HHKB JP keyboard and the dimensions looks the same.

Wednesday 30 October 2013

[Computers] HHKB Pro Type-S JP and accessories arrives!

Yes yes, it has been awhile since I last posted anything. Anyway I have something of more interest worth blogging this time. :p

For those of you not familiar with HHKB it's an acronym for Happy Hacking KeyBoard. These keyboards are made by PFU Limited (of Japan) whilst the underlying keyswitch is by Topre (also from Japan). HHKB is fairly popular for a few reasons (namely Richard Stallman could be one of those). It's a minimalist keyboard designed out of the idea from UNIX guy. Since then the keyboard is fairly popular amongst virtually any OS (well at least major ones).

Since then PFU Limited has been varying the design of the HHKB, first by introducing Lite and Pro2 series. Lite uses a membrane key switch as noted by Wikipedia whilst the Pro2 uses a more mechanial switch. Technically Pro2 isn't using a complete mechanical switch as it features rubberdome over springs type of design. It can still be called mechanical for simplicity sake. There's also a notable price difference between the Lite and Pro2 series and generally speaking for a real keyboard nut, the Pro2 would be the one to go for despite its costs.

Of course PFU Limited hasn't stopped innovating. They have released anniversary editions of the HHKB known as HHKB HG series. These are notably very expensive compared to any of the other HHKB keyboards. I must admit that I quite like the design of the HHKB HG but with such an expensive price tag it somewhat remains out of my reach. Of course those lucky enough to obtain HHKB HG would be very proud owners of such masterpiece.

Then as of more recently PFU Limited released HHKB Type-S along with the JP. Type-S is basically the "silenced" version of the Topre keys. It basically means that it is suitable for those that loves the HHKB layout but prefers it silenced can still enjoy the benefits without making too much noise (and thereby disturbing others if such applies). Though inevitably the silenced variant will cost you more than a regular "non-silenced" variant. Although there has been a few tricks done by a few HHKB Pro2 owners on geekhack.org forums noticeably to make their regular HHKB Pro2 more silent. The idea of doing it yourself of making HHKB Pro2 silent would most likely be cheaper though for me it just doesn't float my boat for a few personal reasons which I won't discuss.

The HHKB Pro JP are basically HHKB with Japanese layout. There are some pros and cons for HHKB Pro2 and HHKB Pro JP. For whatever reason PFU Limited decided to limit these on is beyond me.

HHKB Pro2 Pros (over HHKB Pro JP):
- Has unpowered USB hub, two extra USB sockets along with the mini USB socket for keyboard inputs.
- A longer space bar that is ideally suited to Western market where the need to use space bar is a necessity for "separating" words.
- Some people on geekhack.org forums have noted the Right Shift key is longer, basically as long as the Left Shift key.
HHKB Pro Cons (over HHKB Pro2 JP):
- It does not have dedicated arrow keys.
- There is a few keys also missing apart from the obvious ones used for Japanese input for instance.

HHKB Pro JP Pros (over HHKB Pro2):
- Has dedicated arrow keys.
- Allows Japanese input (although in theory the keys can be virtually remapped for other IME inputs if needed).

HHKB Pro JP Cons (over HHKB Pro2):
- Does not have unpowered USB hub, basically only mini USB socket for keyboard inputs.
- Smaller space bar. (To be frank this is not restricted to HHKB Pro2 JP, if you have a look at any other keyboard that has JIS keys, such as Kana, henkan, muhenkan, etc keys. You would see they also feature a relatively small bar as compared to the ones that are targeting the Western market which lacks all those extra keys and boasts a normally sized space bar).
- Smaller Right Shift key. (Actually looking at the keyboard, there is two keys for Right Shift. Whilst arguably it is marginally smaller than the Left Shift key when looking at the physical dimensions on the HHKB Pro2 JP layout, the only difference is that one of the Right Shift key does require the use of Fn+Up key as opposed to having a key that does one specific function).

What I have here is the JP layout and Type-S variant. So it's basically a marriage between HHKB Pro JP along with silencers (via foam). There is no price difference between buying a HHKB Pro Type-S as opposed to HHKB Pro JP Type-S you pay the same price to just get extra keys and other differences as noted above. Also I presume buying the HHKB Pro2 would cost just as much as to buy HHKB Pro JP. The only real difference is where one chooses to go for the silenced version or not. Silenced keys versus loud "clicky" keys are a matter of one's personal preference. 

For me after having fairly well researched into my options I chose HHKB Pro Type-S JP for a few reasons:
-  Being a small keyboard (technically known as 60%), I'd like the idea of being able to take them around to places (even in public if need be) and to use the keyboard without making too much noise (implies Type-S benefit).
- I actually need the JP layout because of inputting Japanese via IME. Being a polyglot (of only able to communicate a specific set of language only in part) able to input Japanese for instance is virtually a necessity. Also if I were to input other east Asian languages (for example Chinese), I can easily remap those kana keys for instance to whatever IME shortcuts it allows for Chinese inputs.
- I've never really owned a Japanese keyboard, let alone a Japanese keyboard with Japanese layout. I have touched a few Japanese keyboards but never really owned one myself. So whilst I'm learning (somewhat) Japanese, I technically would be killing two birds with one stone so to speak.
- I also have thoroughly contemplated which HHKB Pro Type-S I needed, specifically the key layout. Of course both have differing pros and cons, I've weighed up on what I really need and the JP layout is suitable for my own use. Basically I don't really care about JP layout's weaknesses as I could easily adapt if needed be.

Although I'm also somewhat sure that HHKB Pro JP probably isn't as popular with Japanese even more so is from a Topre fan (I must dare say :D) OO2 of deskthority.net to admit the same point. I could see it as some sort of benefit into learning the JIS layout which HHKB Pro JP unfortunately does not come with Japanese character legends. In other words, unless I go and buy a suitable key caps with Japanese character legends so I could really start practising. I'm more or less stuck with having to deal with virtual keyboard to get by (and that is not really ideal as it will just make me wanting to use IME more). Ultimately I will have to buy key cap with Japanese character legends for my HHKB, it somewhat just doesn't seem right for a HHKB Pro JP to not even come with Japanese character legends let alone as an option for purchase.

After having decided to which (available) HHKB to buy I initially was looking at a couple of sites and to somehow get by with purchasing from all over the place. There is a US site (elitekeyboards.com) offering HHKB Pro but there are no Japanese layout variant (unarguably for obvious reasons). There was amazon.co.jp but that didn't allow shipping outside Japan (plus your amazon.co.jp account is completely separate from your amazon.com account in adding extra confusion). I ultimately decided to settle into ebay.com. Going through maybe less than a handful of HHKB sellers on Ebay with the layout and the specific version that I want. I decided to go through jp-okinawa (an actual Ebay seller). At the same time I was looking into various accessories one could get for HHKB.

I then basically summed up my wants:
- HHKB Pro Type-S JP
- HHKB Carry bag, for carrying HHKB and a few other things if need be.
- HHKB keyboard roof which I believe would be handy in not only preventing dust from easily getting in between keys but also to somewhat shield the keyboard from accidental key presses and maybe extra layer of protection whilst keyboard is in transit (in the bag of course).
- HHKB acrylic palm rest. This was something that I happen to coincidentally found after sourcing the HHKB Keyboard roof also from Japan as elitekeyboards.com did not stock the HHKB Keyboard roof for quite sometime. There's actually a couple of variations available for the HHKB palm rest from the same company. Though I chose to stick with acrylic as it matches with the keyboard roof material and also with my "glass" desk.
- HHKB spare key cap set. Initially I thought that this is just the letters on my keys would become either yellow, shiny and/or generally get discoloured over time so I thought having a spare set and replacing them as necessary would be ideal if in case PFU no longer makes HHKB or HHKB Pro JP. Also it comes with a key cap pulling tool which I was also planning to get from elitekeyboards.com initially. Realistically HHKB keycaps are sublimated which basically means that it would most likely last an eternity as opposed to other letter printing form on keycap.

For those who wants to know the model/part numbers of my purchase:
- HHKB Pro Type-S JP (PD-KB420WS)
- HHKB Carry bag (PD-KB01S)
- HHKB Keyboard roof [Bird electron brand] (RF-HH)
- HHKB acrylic palm rest [Bird electron brand] (CP-HHK)
- HHKB spare key cap set. *specifically for HHKB Pro JP series*(PD-KB420KTW)
Both the HHKB keyboard roof and the acrylic palm rest are by the same company for where I bought mine. The company is known as Bird Electron, they honestly have lots more other accessories that could accompany HHKB for instance but of course it entirely depends on how you want your desk layout to be. Bird Electron is also a Japanese company, all the merrier that it now seems like I can basically get it all from one place and have it shipped to me as one package rather than several small packages and possibly having to pay extra as a result. Plus I personally didn't really like the idea of having too many parcels sent to me for personal reasons.

Luckily jp-okinawa allowed people to buy any other goods from Japan even if it's not listed on his seller page, of course for a small handling fee. Also combining parcels was ok with him as that was more or less a must for me. Again I must admit that I really don't like the idea of seeing so many small parcels especially if they are coming from one country. 

So, I've gone ahead and paid for the keyboard. Inevitably I found out later on as Hasu (on geekhack.org forums) pointed out that now (as of writing) is probably one of the worst time to buy HHKB keyboard because of it's price. I've more or less shrugged the idea off, basically I need a new keyboard soon either way and a small one, etc would be nice plus I've always wanted a HHKB since several years ago.

I noticed that jp-okinawa is from Japan, cool so he can speak Japanese maybe it might be easier for him if I wrote to him in Japanese. I decided to ask my questions via paypal message along with Ebay (originally). I must stress that my Japanese is "broken", if there's a real Japanese speaker he/she would instantly pick out where I've went wrong, in other words I'm going on a risk because I may end up being mocked by one. 

I was really surprised that jp-okinawa replied to my message that I sent via paypal message detailing that I wanted extra stuff (such as keyboard roof) very quickly. Even more, he replied in English also asking me if it would be ok if he were to reply instead in Japanese. I told him that I personally would prefer English as my Japanese sucks. He was fine with that which made my life a lot easier. So anyway since then I've replied back to him via email with what I wanted along with HHKB and keyboard roof. I've also asked a few questions about HHKB bag as well because I noticed there was a slight variation with photos provided on one other Ebay seller's photo versus the photo provided on amazon website. Namely there is a black tag missing on the ends of the zippers. He replied that he could not see if there was a tag on the official website (also providing photos). Long story short, there is a black tag when I received my parcel and opened them.

At the time jp-okinawa did reply that he also has HHKB keyboard roof in stock, I was surprised. I was somewhat having a bit of a hard time navigating around specifically for what I want on Ebay and he tells me he has them. Though for the rest of the stuff that I wanted they needed to be ordered. Though I was surprised nonetheless. Whilst those extra accessories that I wanted needs to be first sent to him (and also there was a public holiday in which I think maybe was a gazetted public holiday in Japan). Both jp-okinawa and I bounced emails back and forth discussing of various interests for instance.

Ultimately I was very happy that it was shipped, he provided the tracking number and I was able to check on its progress. I must admit that I was quite anxious with my parcel because I've spent a large wad of money on the entire thing. XD It finally arrived at my doorstep and I've managed to take photographs.

Without much further ado, I shall present the photos.
NOKIA|N900|Not defined|1/22sec|F2.8|5.2mm|ISO-200|No flash|2013:10:30 13:46:18
Nice big box and it looked like as if it came from PFU Direct!

Nokia|N900|Not defined|1/26sec|F2.8|5.2mm|ISO-200|Fired|2013:10:30 13:48:15
Looks like it is definitely well packaged. That bubble wrap was placed on top as it is (not packing anything inside it) though it is fairly thick.

Nokia|N900|Not defined|1/20sec|F2.8|5.2mm|ISO-229|Fired|2013:10:30 13:48:40
The first layer reveals the acrylic palm rest on top and HHKB carrying bag.

Nokia|N900|Not defined|1/20sec|F2.8|5.2mm|ISO-372|Fired|2013:10:30 13:49:02
After taking the acrylic palm rest reveals keyboard roof.

Nokia|N900|Not defined|1/20sec|F2.8|5.2mm|ISO-229|Fired|2013:10:30 13:49:15
Taking the HHKB carrying bag reveals the main star. The HHKB :D

Nokia|N900|Not defined|1/20sec|F2.8|5.2mm|ISO-200|Fired|2013:10:30 13:49:37
Finally, after taking the keyboard roof out reveals the final item that I ordered. A set of spare key caps for HHKB Pro JP.

Nokia|N900|Not defined|1/25sec|F2.8|5.2mm|ISO-200|Fired|2013:10:30 13:50:40
Here is the contents of the keyboard roof. It seems like they have included sticky pad in which I guess one has to do-it-yourself with application. Interesting!

Nokia|N900|Not defined|1/33sec|F2.8|5.2mm|ISO-123|No flash|2013:10:30 13:50:58
Here is the keyboard roof taken from another angle. It clearly looks quite different from the one offered by elitekeyboards.com. This is the Japanese variant!

Nokia|N900|Not defined|1/33sec|F2.8|5.2mm|ISO-174|No flash|2013:10:30 13:52:07
Here is the contents of the acrylic palm rest. What a nice slab of pure acrylic. lol

Nokia|N900|Not defined|1/33sec|F2.8|5.2mm|ISO-107|No flash|2013:10:30 13:52:18
 Yet another view of the acrylic palm rest.

Nokia|N900|Not defined|1/29sec|F2.8|5.2mm|ISO-200|No flash|2013:10:30 13:52:41
This is basically what you get for ordering a set of spare key caps. Well apart from it not being bubble wrapped but I guess combined parcel makes the need for bubble wrap for each and every item would seem overkill.

Nokia|N900|Not defined|1/28sec|F2.8|5.2mm|ISO-200|No flash|2013:10:30 13:53:01
 Opening the set of spare key caps package reveasl a guide and the list of key caps included I guess. You can see that weird "U" shaped tool to the right of the Japanese manual is the key cap puller tool. Remarkably different than other key cap pullers seen (with bare metal wires on one end and just a handle on the other end).

Nokia|N900|Not defined|1/20sec|F2.8|5.2mm|ISO-246|No flash|2013:10:30 13:54:00
 Key cap puller tool along with the manual sits on its own little box. There's a thin cardboard layer that splits between top and bottom of the box. The thin cardboard layer holds the key caps in place. From top to bottom within the box: thin cardboard layer, key cap puller tool (in a rather chunky cardboard) and the set of key caps.

Nokia|N900|Not defined|1/20sec|F2.8|5.2mm|ISO-325|No flash|2013:10:30 13:54:57
 Here's the HHKB carrying bag. Nifty as usual.

Nokia|N900|Not defined|1/23sec|F2.8|5.2mm|ISO-200|No flash|2013:10:30 13:55:07
The opposite side of the HHKB carrying bag. The information printed in Japanese basically discusses about precautions with storage, usage, etc.

Nokia|N900|Not defined|1/20sec|F2.8|5.2mm|ISO-246|Fired|2013:10:30 13:55:51
Here is the HHKB carrying bag once taken out of that plastic bag. You can clearly see on the left hand side the little black tags on the zippers itself was the question that I asked. I guess jp-okinawa may have just ordered it from PFU Direct directly and so was probably not able to see the contents. Anyhow, just that little black tag on the zipper was something that I thought it was cute to have. Upon closer inspection, the little blue strips doesn't have anything printed. I thought it would be interesting if they did actually print something. Overall it still looks quite cute.

Nokia|N900|Not defined|1/20sec|F2.8|5.2mm|ISO-282|Fired|2013:10:30 13:56:38
Here is the main star. You can now see it in it's glory. HHKB Pro Type-S JP. It seems like the "Type-S" on this box is printed in a sticker form. Oh well. It is Type-S nonetheless.

Nokia|N900|Not defined|1/20sec|F2.8|5.2mm|ISO-325|Fired|2013:10:30 13:56:54
 A photo of the main star on one side...

Nokia|N900|Not defined|1/33sec|F2.8|5.2mm|ISO-186|Fired|2013:10:30 13:57:22
 ... and then the other side.

Nokia|N900|Not defined|1/20sec|F2.8|5.2mm|ISO-264|Fired|2013:10:30 13:57:36
 Here is the opposite side of the box. Here you can see various features of the keyboard. In the first box (on the left) it describes about the Topre technology and the keyboard design, how it's smaller, customisability, kana input(?), PC/Mac compatible, Height adjustments, etc, etc, etc.

Nokia|N900|Not defined|1/20sec|F2.8|5.2mm|ISO-264|No flash|2013:10:30 13:58:06
Opening the box reveals Safety instructions and Registration form. Interesting to see the model number is partly filled, leaving options to specify whether you have {black,white}/{silent,non-silent}/etc. It sort of made me think that the packaging box PFU Limited uses for HHKB Pro2 and HHKB Pro JP are virtually identical except for the little sticker on top as well as English/Japanese variant. Clearly nothing to indicate the colour of the keyboard and/or if it is silent based, leaving the little sticker to basically describe the rest. Of course nothing wrong with that, just interesting note to muse on in curiousity.

Nokia|N900|Not defined|1/20sec|F2.8|5.2mm|ISO-325|Fired|2013:10:30 13:58:26
After taking those papers out one can see the USB cable lead.

Nokia|N900|Not defined|1/33sec|F2.8|5.2mm|ISO-100|Fired|2013:10:30 13:58:40
Now pulling out that thin cardboard layer reveals HHKB Pro Type-S in it's native form.

Nokia|N900|Not defined|1/24sec|F2.8|5.2mm|ISO-200|No fllash|2013:10:30 13:59:21
Here is just the reverse side of the HHKB Pro Type-S JP. As usual it describes the DIP switches and its resultant setting. I'm sure the DIP settings are the same for all HHKB Pro keyboards. Obviously not sure about Lite or HG models. :p

Nokia|N900|Not defined|1/20sec|F2.8|5.2mm|ISO-246|No flash|2013:10:30 14:00:33
Having a closer look at the acrylic palm rest. Something seems a little weird here.

Nokia|N900|Not defined|1/20sec|F2.8|5.2mm|ISO-214|No flash|2013:10:30 14:01:29
 It looks like four maybe plastic set of legs printed on one non-dividing 3M tape.

Nokia|N900|Not defined|1/20sec|F2.8|5.2mm|ISO-214|No flash|2013:10:30 14:01:48
Here's a look at the reverse side of that four bit of legs. Clearly it is one piece. So it looks like some work is needed to get them onto the acrylic palm rest. Otherwise acrylic palm rest will move around without much restriction. Also I don't personally think not having those legs fitted may make one's experience of resting on acrylic palm rest itself any particularly comfortable either.

Nokia|N900|Not defined|1/21sec|F2.8|5.2mm|ISO-200|No flash|2013:10:30 14:04:07
So I first decided to cut them into four separate pieces. Probably one of the most easiest part done. Though if those four legs were cut more evenly, maybe it might not be too hard to cut into a nice shape to aid in peeling the sticky bits.

Nokia|N900|Not defined|1/20sec|F2.8|5.2mm|ISO-229|No flash|2013:10:30 14:08:41
Unfortunately that took a bit of time... -_-' I had to somewhat precisely cut (with scissors) those round things. A keen eyed viewer would see that there's bit of extra plastic that sits below each little dome pads. Cutting the unneeded stuff around the edges may seem overkill at this point I guess. Oh well too late I can't go back now.

Nokia|N900|Not defined|1/20sec|F2.8|5.2mm|ISO-246|No flash|2013:10:30 14:11:38
 So I decided to stick them on one side of the acrylic palm rest. Obviously, though I screwed up on my second leg (top left), it seems like I've stuck it too far in and now it doesn't seem to be easy to try and shift it to a new location. Bugger, oh well it can't be helped. ( ._.);

Nokia|N900|Not defined|1/20sec|F2.8|5.2mm|ISO-303|No flash|2013:10:30 14:15:32
Now moving right along, time to see what is up with those extra pads for keyboard roof.

Nokia|N900|Not defined|1/20sec|F2.8|5.2mm|ISO-214|No flash|2013:10:30 14:16:11
I guess it allows one to position the ideal locations for giving that bit of leeway when maybe say for instance some heavy object is placed on top of the keyboard roof. Though the sticky pads being provided as is without being made to be permanently part of the keyboard roof allows one to customise the locations for the pads to the owner's content. Yay! this will be interesting. Going to start sticking in the usual areas except for maybe where on the HHKB is printed "Type-S". I don't like to have a little rubbery type thing rubbing up and down that logo, so I'm going to place it a little further away and preserve that logo! muhahahaha.

Nokia|N900|Not defined|1/20sec|F2.8|5.2mm|ISO-246|No flash|2013:10:30 14:19:34
Of course I didn't do the exact measurements and placing those pads in the precise sort of measurement on that Type-S logo. I just took a rough guess and was probably off by a few centimetres. Meh.

Nokia|N900|Not defined|1/30sec|F2.8|5.2mm|ISO-200|No flash|2013:10:30 14:19:51
Another photo of the HHKB with keyboard roof on top. You can see there's now a small gap between where acrylic's bottom part sits. Now there won't be an easy chance for the acrylic to start scratching keyboard parts when one normally places the keyboard roof of course.

Nokia|N900|Not defined|1/21sec|F2.8|5.2mm|ISO-200|No flash|2013:10:30 14:21:07
Here is the complete set for I guess preserving the keyboard and allowing a somewhat comfortable feel when tapping away on the keys. I honestly believe they look well together, acrylic type keyboard roof and acrylic palm rest.

Nokia|N900|Not defined|1/33sec|F2.8|5.2mm|ISO-174|No flash|2013:10:30 14:21:25
 Another view of the setup. Gotta admit it looks really nice.

Nokia|N900|Not defined|1/20sec|F2.8|5.2mm|ISO-303|No flash|2013:10:30 14:22:37
Alright time to fit all these into the carrying bag. I wonder if the keyboard and the keyboard will fit like I thought it might (of course in theory).

Nokia|N900|Not defined|1/20sec|F2.8|5.2mm|ISO-214|Fired|2013:10:30 14:23:13
 It does! very nice, now to fit the acrylic palm rest and the USB cable...

Nokia|N900|Not defined|1/20sec|F2.8|5.2mm|ISO-372|Fired|2013:10:30 14:23:54
Looks like she's ready to go boss! HHKB can now be taken away 'in style'   (・∀・)

N.B.: Whilst I did mention earlier on that my desk was a glass type desk (with metal rods as the frame of course). Keen readers would probably be wondering why all my photographs are done on another desk. I have to admit my glass desk isn't quite up to scratch. Though whilst blogging now on that very same desk it does look nice (glass desk that is). 

Also acrylic palm rest is prone to get dirty quite easily. Though I'm sure it would be just as easy to wipe the marks off if needed be.

Last but not least, because I'm running linux I haven't seen any keyboard mapping that is written specifically for a HHKB let alone the Japanese layout variant. I have already written up a rough one based (shamelessly that is) off another person's .Xmodmap. Though I have yet to fully test it and see if it works prior to releasing to the public. Stay tuned! I may release it soon.